Response Approval
This action allows the IRB Administrator to approve a protocol re-submission that is a response to revisions requested by the IRB office. When investigators make requested changes and re-submit a protocol an institution may decide that it does not require a full committee review again. The Response Approval action allows the IRB Administrator to grant an approval to the protocol in such a scenario.
Table 353 Protocol Document, Protocol Actions Page, Request an Action Section, Available Actions – Response Approval Action Attributes
|
Action attributes |
Description |
|
Who can perform action |
IRB Administrators are allowed to perform this action. |
|
Protocol state prior to action |
Prior to the action being performed, the protocol must be in the following state:
The submission review type must be Response The protocol status can be in any state The submission status can be in any state |
|
Protocol state after action |
After the action is performed The protocol status changes to Active - Open to Enrollment The submission status changes to Approved |
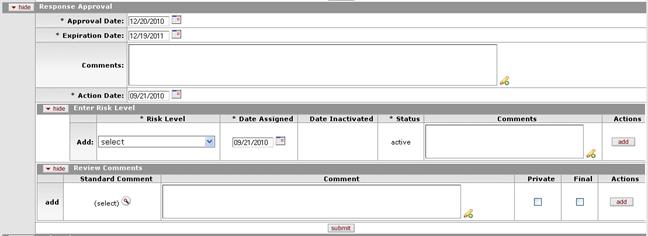
Figure 714 Protocol Document, Protocol Actions Page, Request an Action Section, Available Actions – Response Approval Layout
Table 354 Protocol Document, Protocol Actions Page, Request an Action Section, Available Actions – Response Approval Field Descriptions
|
Field |
Description |
|
Response Approval | |
|
Approval Date |
Specify the date you want the approval action to become
effective. By default, the field displays the current date. To
change it, click the calendar |
|
Expiration Date |
Enter the future date when the approval will
expire. Click the calendar
|
|
Comments |
Click within the text box (or press the tab |
|
Action Date |
Specify the date you want this action to become
effective. By default, the field displays the current date. To
change it, click the calendar |
|
Enter Risk Level | |
|
Risk Level |
Select one of the following options: • No greater than minimal risk. • Greater than minimal risk but potential for direct benefit for participant • Moderate Risk • Research involving greater than minimal risk, with no potential for benefit to participant, but likely to yield generalizable knowledge about the participant’s condition • High Risk Use the drop-down
|
|
Date Assigned |
By default, this displays the current date. To
change it, click the calendar |
|
Date Inactivated |
When the status is inactive, the date it became inactive is displayed. |
|
Status |
Display-only (for example, active). The current status of the risk level. |
|
Comments |
To enter textual information to describe the selection
of the risk level, click within the text box (or press the tab |
|
Actions |
Click the add
|
|
Review Comments |
|


 key from a previous
field) to relocate the cursor to the field, and then type (or paste from
virtual clipboard) to enter text in the box as necessary to provide the
appropriate information. Click the add note
key from a previous
field) to relocate the cursor to the field, and then type (or paste from
virtual clipboard) to enter text in the box as necessary to provide the
appropriate information. Click the add note  icon to view/edit/paste text
in a new browser window, then click the continue button to return to the
text entry field in the document. After saved, click the green arrow
icon to view/edit/paste text
in a new browser window, then click the continue button to return to the
text entry field in the document. After saved, click the green arrow
 symbol to view full
text in a separate browser window.
symbol to view full
text in a separate browser window.
 The available Risk Levels are
modified via the
The available Risk Levels are
modified via the  button to add your selection to
as a row in the table below, which will become a numbered line item.
Click the delete
button to add your selection to
as a row in the table below, which will become a numbered line item.
Click the delete button to remove a previously-added line item row from the table.