Proposal & Budget Development Process
Scope
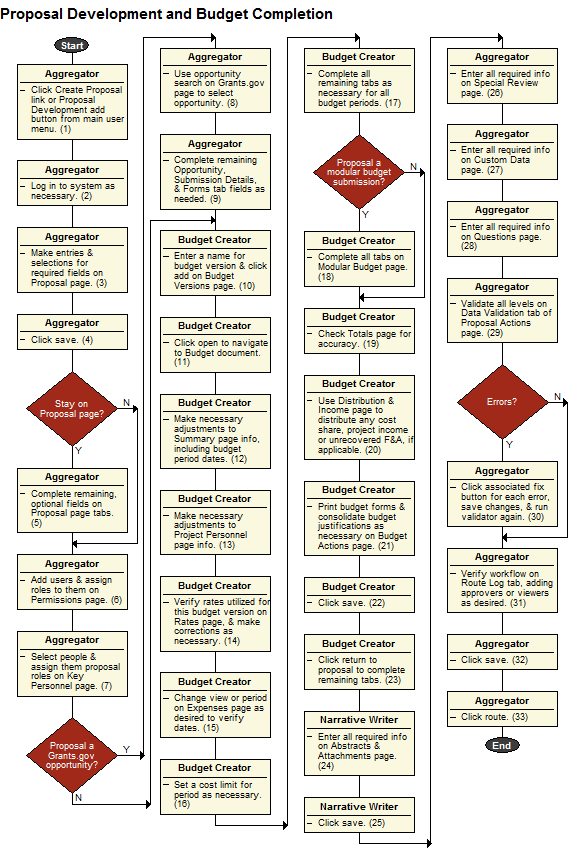
This procedure covers an example the navigation and completion sequence for preparation and submission of Proposal and Budget documents in the Proposal Development module of KC.
This procedure does not cover what occurs after routing or after an approved Proposal has been submitted.
Policy
The tasks that comprise this procedure may be completed in a different sequence, depending on your unique customization and/or configuration of the software to suit your institution’s policies and business rules.
Responsibility
The Principal Investigator is responsible for ensuring this procedure is accurate, necessary, and reflects actual practice at your institution.
Activity Preface
This activity is performed whenever there is a need for development of electronic proposal and budget documentation for a proposed research project at a higher education institution that will be submitted to a potential sponsor agency for consideration.
|
|
This is intended to serve as an example of a likely KC Proposal and Budget Development module completion sequence. KC’s flexibility allows for electronic proposal and budget document preparation to suit the personnel and business processes involved at your institution. |
The Generic Actor associated with the tasks in this procedure may refer to any the following equivalent, applicable job titles:
• Researcher
• Unit
• Central Admin
• Principal Investigator
• Initiator
• Proposal Creator
|
|
This is merely a sample scenario. One individual could theoretically perform all of the following, however, it is likely that more than one is involved at most institutions. |
1. Click
Create Proposal
link or Proposal Development add  button from main user menu.
• This creates a new, blank Proposal document.
2. Log in to the system as necessary.
• Enter your user name and password in corresponding fields and click login button.
3. Make entries and selections for required fields on the Proposal page.
• These include Description in Document Overview tab and Required Fields for Saving Document tab.
• This prevents loss of work and need to start over.
If stay on Proposal page, go to task #5. Otherwise, go to task #6.
5. Complete the remaining, optional fields on the Proposal page tabs.
• Click show as necessary to view hidden tab fields for the Sponsor & Program Information, Organization/Location, Delivery Info and Keywords tabs.
6. Add users and assign roles to them on the Permissions page.
• Use the person
lookup  to add users and select from Aggregator, Narrative Writer, Budget Creator and Viewer for each.
7. Select people and assign them proposal roles on the Key Personnel page.
• Use the search
 feature to locate employees and
non-employees.
• Select from Principal Investigator, Co-Investigator & Key Person for each person.
If proposal a Grants.gov opportunity, go to task #8. Otherwise, go to task #10.
8. Use the opportunity search on the Grants.gov page to select the opportunity.
• Some of the fields on the Grants.gov page tabs are populated automatically where possible based on the opportunity you selected.
9. Complete the remaining Opportunity, Submission Details, and Forms tab fields as needed.
10. Enter a name for the budget version and click add on the Budget Versions page.
11. Click open to navigate to the Budget document.
12. Make necessary adjustments to the Summary page information, including the budget period dates.
13. Make necessary adjustments to the Project Personnel page information.
• The name list display is based on selections made on the Key Personnel page of the Proposal document.
• You may remove, use search to add, or add to-be-named positions.
14. Verify the rates utilized for this budget version on the Rates page, and make corrections as necessary.
15. Change the view or period on the Expenses page as desired to verify the dates.
16. Set a cost limit for the period as necessary.
17. Complete all remaining tabs as necessary for all budget periods.
• Personnel, Equipment, Travel, Participant Support and Other Direct.
If proposal a modular budget submission, go to task #18. Otherwise, go to task #19.
18. Complete all tabs on the Modular Budget page.
19. Check the Totals page for accuracy.
20. Use the Distribution & Income page to distribute any cost share, project income or unrecovered F&A, if applicable.
21. Print budget forms and consolidate budget justifications as necessary on the Budget Actions page.
23. Click return to proposal to complete remaining tabs.
24. Enter all required information on the Abstracts & Attachments page.
• Proposal Abstract, Personnel Attachments and Proposal Narrative tabs.
26. Enter all required information on the Special Review page.
27. Enter all required information on the Custom Data page.
28. Enter all required information on the Questions page.
29. Validate all levels on the Data Validation tab of the Proposal Actions page.
If errors, go to task #30. Otherwise, go to task #31.
30. Click the associated fix button for each error, save changes, and run validator again.
31. Verify the workflow on the Route Log tab, adding approvers or viewers as desired.
Process Flow

Figure 283 - Proposal & Budget Development Completion Example Process Flowchart

