Lookup
Lookup screens are accessed either by clicking menu links or by clicking the Lookup icon (round magnifying glass) located to the right of fields on various screens and documents throughout the KC system. This function (sometimes referred to as “search” or “inquiry and maintenance” ) allows you to look up reference table information from maintenance documents and display a list of valid values from which to select and return to populate the field. This enables you to find what you need when all or a portion of the valid value is unknown, and prevents you from making data entry errors. Usage of functionality associated with Lookups is covered here according to the following subtopics:
• Search Criteria Entry/Selection
• Search Results
• Maintenance Links
• Export Functionality
• Field Lookup
• Multiple Value Lookup
Search Criteria Entry/Selection

• Required Fields: Some fields in the search criteria section of Lookup screens are required to conduct the search, and are marked with an asterisk (*) to the left of the field label, as with e-doc screens.

• Lookup Fields: Search criteria section fields marked with the Lookup icon (round magnifying glass) on the right of the entry box allow you to look up the reference table information to select from in order to specify search criteria and avoid data entry errors. Click the icon to display a list of valid values from which to select and return to populate the box.
• Direct Inquiry Fields: Search criteria section fields that also have the Direct Inquiry icon (open book) appearing to the right enable you to…
• Selection Tools: Standard selection tools are provided for some criteria section fields. Use the drop-down menus and radio buttons to select options to specify search criteria as appropriate.

• Date Fields: Dates should be specified as mm/dd/yyyy format. Click the date selector icon where available to select a date from a calendar to populate date fields.

• Action Buttons: Click search to initiate your search, clear to return search criteria fields you previously populated to a blank state, or cancel to return to the main menu.
• Create New and Main: Click the create new button on the upper-right corner of the Lookup screen to navigate to a new, blank document for creating a new record for the lookup document type that is displayed when clicked. Click the Main link to return to the default start screen (main menu).

• Wildcard Use: Wildcard (%) and truncation (*) symbols are allowed on strings when a portion of search criteria is known. Use the wildcard and truncation symbols to create searches where there are unknown characters, multiple spellings or various beginnings/endings. Enter the prefix, suffix, or root of a search term and replace the missing portion with an asterisk to find all forms of that word. Use the wildcard within your search criteria entry to replace each unknown character within a term to find all citations of that word with the percent symbol replaced by a letter.
|
|
For more detailed instructions about how to use wildcards for searching, see “Searching With Wildcards” on page 84. |

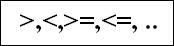
• Range Operators: Range operators allowed on numerics and dates are >,<,>=,<=, or ‘..’. All operators except .. should be before date value. Operator ‘..’ should separate date values.

• Direct Inquiry: Find records based on parameters entered for a particular section.
|
|
For more information about using the direct inquiry feature, see “Direct Inquiry” on page Error! Bookmark not defined.. |
Search Results

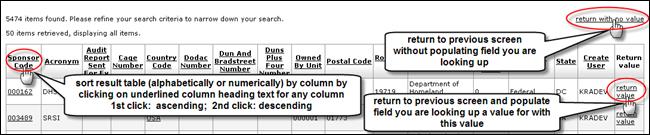
• Column Headings: Each result field has link on header for sorting. Click once to sort ascending, and click again to sort descending.
• Result Text Case: Most search result content is displayed in uppercase.
• Inquiry Drilldowns: Some row fields have links to inquiry. The inquiry will be presented in a new window.
• Return value: Click the return value link to select a row and return the key value to the previous page.
• Return with no value: Click return with no value or click the cancel button if you wish to return to the lookup screen without returning a value.
Maintenance Links

• Actions Column: For each result row the action column displays edit and copy links.
• Edit Link: Click edit to navigate to a maintenance document for editing the current record.
• Copy Link: Click copy to navigate to a new maintenance document but copy over attributes to replace the current record.
Export Functionality

• Export Option Links: At the end of each result set, there are links for exporting the data to a different format. If you wish to export the result of the table lookup to your local computer, either in the CSV, Excel, or XML format, simply click CSV to export the data as a comma delimited file (comma separated value), spreadsheet to export the data as a spreadsheet, or XML to export the data as xml (extensible markup language).
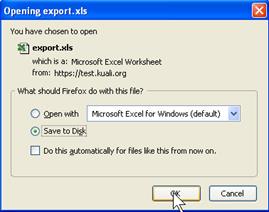
• Open With/Save Options: Depending on your settings, your computer’s default Web download manager application will prompt you to either open the file with the default application, choose another to open it with, or save the exported file to a default location on your computer’s hard drive.
Field Lookup
When the Lookup icon appears to the right of a field, clicking it takes you to a lookup screen which allows you to enter search criteria and return a list of valid values from which to select and return in order to populate the field.
|
|
To look up valid values: |
|
1. |
Fill in one or more search criteria boxes to get a list of valid values in the field lookup (or leave all the search criteria blank to retrieve all). |
|
2. |
Click A results table appears below the search criteria section of the screen, displaying the list of applicable values that you have requested.
|

Available Actions From Field Lookup Results
After KC retrieves valid values in the field lookup and displays the list, you may take the following actions by clicking the hyperlinks available in the results table.
• Click the name of the column to sort the retrieved values by that column (alphanumeric ascending/descending toggle).
• Click return value to select the code.
• Click return with no value to cancel the search (or click cancel).
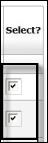
Multiple Value Lookup
Some documents that require a list of values come with a special multiple value lookup screen where you may select multiple values from the search list.
You will find the Look Up / Add Multiple xxx Lines  (where xxx is the name of the
attributes you are updating) in the applicable section of the tab where this
feature is available.
(where xxx is the name of the
attributes you are updating) in the applicable section of the tab where this
feature is available.
 To look up, select and return
multiple values:
To look up, select and return
multiple values:
• Click
the Look Up / Add Multiple xxx Lines icon to navigate to
a special search screen where you are given an opportunity to build a list of
values from which you may choose one or more values by selecting the check boxes
in the right most column.
• Then click either:
o  to select all values in the list
o  to clear the check boxes for all values
in the list
to clear the check boxes for all values
in the list
o  to populate the tab you came from with
multiple values
to populate the tab you came from with
multiple values
o  to return to the tab you came from
without populating the tab
to return to the tab you came from
without populating the tab

The Route Log icon (magnifying glass over a piece of paper) appears in search result tables that, when clicked, causes Route Log information to display in a new browser window in the forefront of the KC application. It displays the same document status and routing information that can be accessed and viewed from the Route Log tab that is common to many e-docs (for example, in the Proposal Development document, this tab appears on the Proposal Actions page).
|
|
For more detailed information about the Route Log tab, see the “Route Log” on page Error! Bookmark not defined.. |

The Expand Text Area icon displays a larger text entry box in a separate pop-up window that allows you to view/edit text with more “screen real estate.”
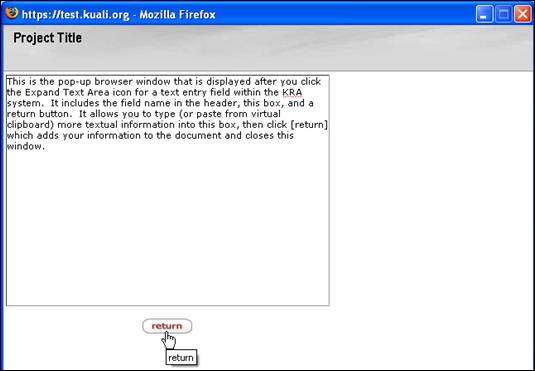
Figure 32 Enter Text and Click Return

View Previously-Entered Text: When accessing an existing, saved document where text has already been entered into a text box field, you will see that the “add note” icon (pencil with plus + symbol) has been replaced by the green arrow icon. Clicking it causes a new browser (or tab, depending on your browser settings) popup window to appear containing the note text and a close button that allows you to close the expanded text area window and return to the document after viewing the note.

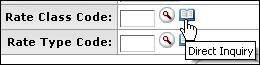
The Direct Inquiry feature appears as an open book icon. It usually appears to the right of the lookup icon for most editable fields. Its purpose is to display an inquiry screen when the field contains a valid value and the icon is clicked.
It allows you to populate the field quickly and differs from the lookup icon by automatically returning a valid table value from the database.
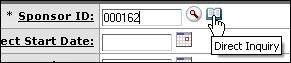
• Enter known information into the box (for example, Sponsor ID field).
• Click the Direct Inquiry icon.
A pop-up window appears in the forefront, displaying identifying information available for the code you entered:
Figure 33 Direct Inquiry Result Popup Window Example: Sponsor Tab Identifying Information

To retain the information in this window for future reference in populating your currently-accessed e-doc, you can either click on the e-doc screen again to cause this popup to be in the background, or you can minimize it by clicking the minimize browser button to keep it handy and readily available.
To close the information displayed when no longer needed,
click the browser close  button to close the popup window and
return to e-doc screen.
button to close the popup window and
return to e-doc screen.
Successful Inquiry Results
When the information to populate a field is known and entered, clicking the Direct Inquiry icon will cause the related text to be displayed beneath the field:
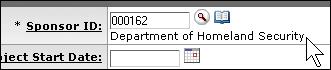
Figure 34 This display of the name serves as confirmation that the field value you entered is valid
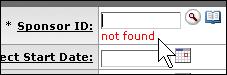
Inquiry Errors
Otherwise, a red error message is displayed:
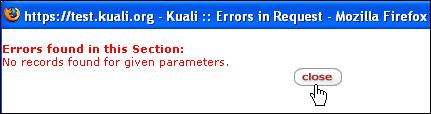
When you click the close button on the popup error message window, the ‘not found’ message is displayed under the field:

The Calendar (also known as date selector) icon enables you to populate date entry form fields by selecting dates from a navigable calendar.

About the Calendar icon

Date Selection Help Within the Tool
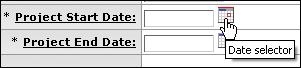
Click on the Calendar icon to display the calendar

Use Navigation buttons as necessary to locate
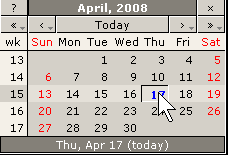
Figure 35 Date Selector (Calendar icon) Click on the numbered date to select it

The calendar closes and your selection appears in the box

The large, yellow asterisk icon marks document areas that contain errors after validation.
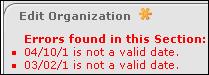
Figure 36 Error Icon on a Tab

Figure 37 Error Icon on a Field

The column sort toggle button (a down arrow on the left with an up arrow on the right) allows you to sort the display of a search result table by that column. Unlike other table headings where the column heading text is underlined and can be clicked on directly to sort, table column heading text that contains sort column buttons is not underlined, and has the buttons appearing one row below the heading, centered under each column heading.

Figure 38 Column Sort Function
Clicking the column once will sort the columns contents in an ascending fashion (whether alphabetical or numeric), and then clicking it a second time will sort the data in descending order. Column sort buttons are typically used on Multiple Value Lookup screens.
|
|
For more information on searching for multiple values, see “Multiple Value Lookup” on page Error! Bookmark not defined.. |
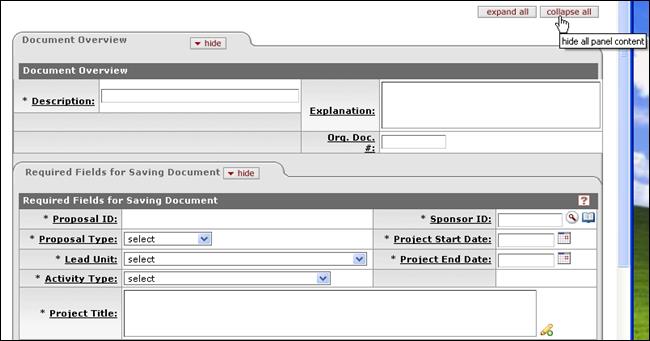
Expand/Collapse All


You may expand or collapse all tabs by clicking expand all or collapse all. These two buttons are located at the top, right of e-doc pages.
Clicking the collapse all button on an e-doc page
For
example, when you click the button (shown above) while one or more
sections have their content displayed, all of the sections of the page that
contain the form fields become hidden from view and only the tab labels are
displayed (as shown below):
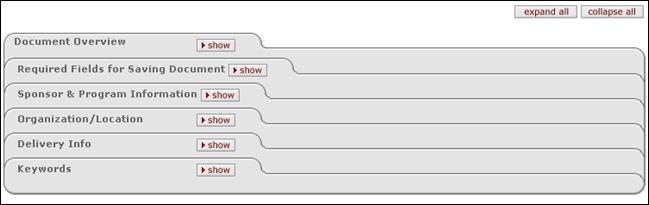
Figure 39 An e-doc page with all sections collapsed
Show/Hide


Use the show or hide buttons (located on the tabs to the right of the section labels) to expand or collapse an individual page section.
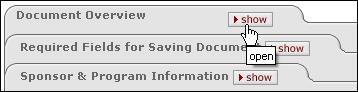
The tab button displays ‘show’ when the page section is closed
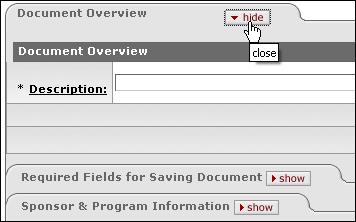
The tab button displays ‘hide’ when the page section is open

Site Index is a blue button appearing at the top, right of e-doc screens and to the left of the “expand/collapse all” buttons. The word “site” refers to the Web site that is synonymous with the KC system, specifically its web-based user interface. Click it to view an index of the KC system.
Required Fields
All of the required fields are denoted with an asterisk *appearing to the left of the field label text.
They serve as an indication that you must complete the particular field before you are able to perform one of the following actions:
• add a line (to create a new item in a table row by clicking an add button)
• save the document (either when new or to save changes made to existing)
• navigate to a different page (which forces an implicit save)
|
|
Some fields may not be marked as required and are indeed not required to perform these three actions, however, they may be required for successful validation (for example, Custom Fields in the Proposal document). |

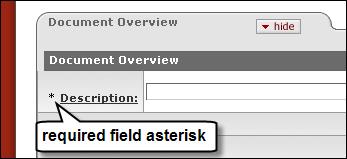
Figure 40 Required field asterisk appears to the left of the field label text
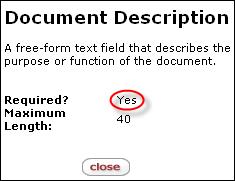
Figure 41 Field-level help includes a Yes/No Required? Display
|
|
Some selections for particular required fields cause other fields to become required, even though they are not marked as such. For example, on the Proposal document, when your selection for the Proposal Type field on the Required Fields for Saving Document tab is “Renewal”, “Revision” or “Continuation”, the Sponsor Proposal ID field on the Sponsor & Program Information tab becomes required. You are notified of this via red error messages upon validation or save. |
Drilldown Links and Icons
Since the KC system is a web-based application, hyperlinks and icons are used both for navigation and for information display. Many of them allow you to drill down into the document detail or to obtain additional information.
Drilldown Links
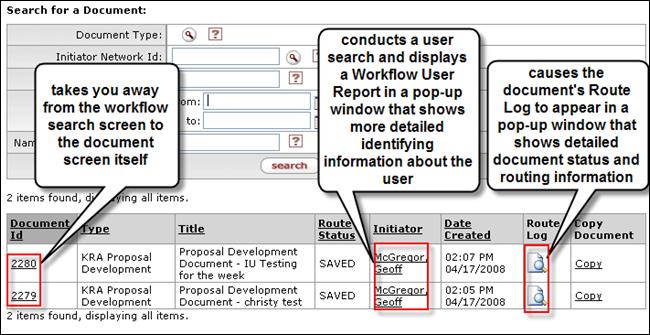
Figure 42 Three Types of Drilldown Links within a search result table
Field-Level Help
Field-level help functions as drill-down links by labels that can be clicked to display more information about the field.
To access field-level help:
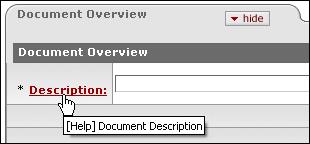
• Click any field label text that is underlined (for example, Description on the Document Overview section).
A new browser window pops up in the forefront that displays the help information:
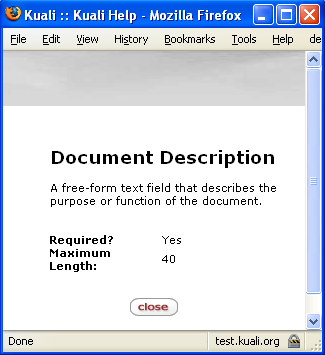
Typically, the Kuali Help information that is displayed comes from a data dictionary that includes the field label name, text describing the purpose and function of the field, an indication of whether the field is required or not, the maximum length of the possible input, the type of input that is accepted (for example, alphanumeric), and a close button that closes the popup browser window and returns you to the KC screen that was displayed when help was accessed.
Popup Text Tips
Figure 43 Nonstandard Functionality Is Reflected in Popup Tool Tip Text Upon Mouse-Over
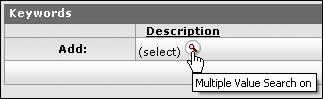
Many buttons, icons, and links throughout KC have popup tips that appear when the mouse cursor hovers above them. While these usually display the same text as the related label or common name, some may have different functions (for example, the lookup icon for adding keywords on a Proposal document displays ‘Multiple Value Search on’ instead of Search as it does most commonly elsewhere).

Page and Screen Action Buttons are generally located at the bottom, center of KC software screens, and typically appear as rectangular keys with rounded corners, white backgrounds and red text. Some may be unique to particular pages of particular documents.

Tab and Section Action Buttons typically are clicked to command system actions whose results are evident within the tabbed sections themselves. These are usually associated with line items (lists displayed as table rows).