Add Personnel Attachment
The Add Personnel Attachment subsection of the Personnel Attachments section provides a way for you to select a person and attachment type, enter a textual description of the attachment, and then attach a selected file and add it as a numbered line item in a table format below.

Figure 834 Protocol Document, Notes & Attachments Page – Personnel Attachments Example
Table 433 Protocol Document, Notes & Attachments Page – Personnel Attachments Column Descriptions
|
Column |
Description |
|
Posted Timestamp |
The time and date the attachment was posted is set automatically by the system after clicking the add button. |
|
Uploaded By |
Displays the User ID of the logged-in user who uploaded the attachment. |
|
Attachment Type |
Required. Select either Biography or Other. Use the drop-down
|
|
Description |
To enter textual information that describes the
attachment, click within the text box (or press the tab |
|
File Name |
Required. Click browse to locate and
select the file you want to attach, then click the add
|
|
Actions |
Required. Click the add
|


 key from a previous
field) to relocate the cursor to the field, and then type (or paste from
virtual clipboard) to enter text in the box as necessary to provide the
appropriate information. Click the add note
key from a previous
field) to relocate the cursor to the field, and then type (or paste from
virtual clipboard) to enter text in the box as necessary to provide the
appropriate information. Click the add note  icon to view/edit/paste text
in a new browser window, then click the continue button to return to the
text entry field in the document. After saving, click the green
arrow
icon to view/edit/paste text
in a new browser window, then click the continue button to return to the
text entry field in the document. After saving, click the green
arrow  symbol to
view full text in a separate browser window. Your entry can be
modified after the Add action.
symbol to
view full text in a separate browser window. Your entry can be
modified after the Add action. button. The system
tracks current and previous versions of attachments, which you can view or
print after adding.
button. The system
tracks current and previous versions of attachments, which you can view or
print after adding. For more information about adding
attachments, see “
For more information about adding
attachments, see “
Unit Details
The Unit Details subsection of the tabbed “Person/Protocol Role Details” section displays the primary Unit Name automatically based on your previous person selection, and by default specifies it as the Lead unit if the Person role is Principal Investigator. It also allows you to delete that numbered line item and search for /select a different Unit Name and corresponding Unit Number and add it. Only one unit can be designated as the lead.
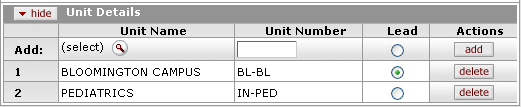
Figure 835 Protocol Document, Personnel Page, Person/Protocol Role Details Section – Unit Details Subsection Example
Table 434 Protocol Document, Personnel Page, Person/Protocol Role Details Section – Unit Details Subsection Column Descriptions
|
Column |
Description |
|
Add/# |
Displays sequential numbers in ascending, top-to-bottom order for each line item added in table row format. |
|
Unit Name |
Click the lookup |
|
Unit Number |
This is populated automatically based on your Unit Name field selection. If known, type the value in the text box field. |
|
Lead |
By default, this is the Lead Unit for the Principal
Investigator you previously selected. Select the radio
button |
|
Actions |
Click the add
|

 by
clicking within a circle to place a dot within it to indicate your
selection of the desired option. Only one line item row can be
selected as the Lead Unit.
by
clicking within a circle to place a dot within it to indicate your
selection of the desired option. Only one line item row can be
selected as the Lead Unit. button to remove a previously-added line item row from the table.
|
|
To delete a “Person/Protocol Role Details Section”:
| ||
|
|
1. |
Click within
the checkbox
| |
|
|
2. |
Click the delete selected action button at the bottom of the page. | |
|
|
|
The section is removed.
| |


 that appears at the left of the section’s folder tab label to select
the item (s). A check mark appears within the checkbox to indicate
the item is selected. Click within the checkbox again to clear the
mark if you want to deselect the item.
that appears at the left of the section’s folder tab label to select
the item (s). A check mark appears within the checkbox to indicate
the item is selected. Click within the checkbox again to clear the
mark if you want to deselect the item.