Notes and Attachments
The Notes and Attachments tab displays user notes, attachments, or system-generated remarks about the document. The number of notes and/or attachments is indicated on the tab label in parentheses. It is a default service provided by the Kuali Enterprise Workflow module, but appears on multiple documents that are a part of multiple functional modules.
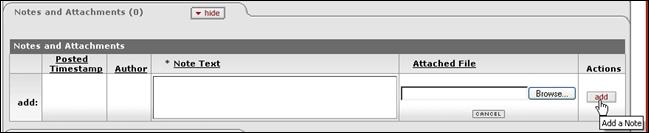
Figure 62 Notes and Attachments Tab
Table 14 Notes and Attachments Column Descriptions
|
Field/Column |
Description |
|
Posted Timestamp |
Display-only. The time and date when the attachment or note was posted |
|
Author |
Display-only. The full name of the user who has added the notes or attachments.
|
|
Note Text |
Required. Enter comments (type or paste from clipboard). |
|
Attached File |
Optional. Displays the path and filename after selection. Select the file to attach by clicking Browse and following Window's standard Choose File dialog box. Click CANCEL to clear the file name that you have selected. After an attachment is added, the field displays a
paper clip |
|
|
Click to use your operating system’s Choose File or File Upload dialog window to locate and select the file you want to attach. |
|
Cancel button |
Click to clear the Attached File box if you have already browsed for and selected a file but have not yet clicked the add button. |
|
Actions |
This column displays the add command button. Some e-docs may also provide the ability to delete attachments, but most do not. |
|
Add button |
Click this after populating the Attached File field via browse and select. Your note and/or file will display in a new numbered row beneath the add: row for each note or attachment. |
 The Author is the person who did
the data-entry, not necessarily the person who completed it, or authored
it.
The Author is the person who did
the data-entry, not necessarily the person who completed it, or authored
it. icon
with the file name, size and associated application.
icon
with the file name, size and associated application. Browse
button
Browse
button

|
|
This tab appears on the Abstracts & Attachments page of the Proposal Development document. The basic process for using this functionality is common to other sections such as Personnel and Internal Attachments as well. See those respective topics for differences and specific guidelines for each. |

 To add an
attachment:
To add an
attachment:

Figure 63 Step 1: Type in Required Topic and Text fields and Click Browse
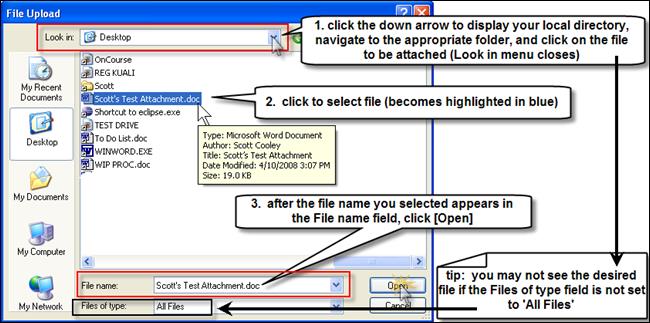
Figure 64 Step 2: Select File To Attach Using the File Upload Dialog Box (Windows XP OS example)

Figure 65 Step 3: After the path & name of your selection are populated, click add
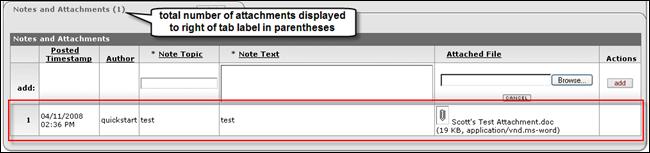
Figure 66 Result: Attachment Line display after the add action (numbered line item)