Preferences
The Preferences link in the Workflow group causes the Workflow Preferences screen to appear. The Workflow Preferences screen allows you to customize the appearance and functionality of your Action List. This includes the ability to adjust refresh rate, page size, email notifications and delegate filters; to specify which fields are displayed; and to specify the colors associated with documents in each route status.
Access
The Workflow Preferences screen is accessed in two ways in KC: (1) by clicking the action list button (always available) and then the preferences button at the top, right of the Action List screen; or (2) by clicking the Preferences link in the Workflow group from the Researcher, Unit, or Central Admin menus.
•  >
> 
•  or
or  or
or  >
> 
Layout
The Workflow Preferences screen has three sections that group related preference options:
• General
• Fields Displayed In Action List
• Document Route Status Colors for Action List Entries
Action buttons at the bottom, center of the screen allow you to:
• save: save changes made to preferences
• reset: return to the default preferences
• cancel: cancel changes made to this screen
The General section of the Workflow Preferences page allows you to choose how frequently the page refreshes, select how many Action Requests appear per page, select the frequency of (or disable) e-mail notification regarding new requests, and limit the list of documents to display in the Action List by setting filters for Delegators.
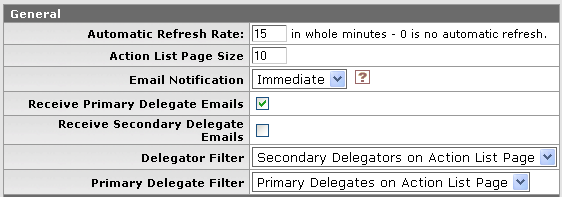
Figure 125 Workflow Preferences Screen – General Section Default Layout Example
Table 43 Workflow Preferences Screen – General Section Field Descriptions
|
Field |
Description |
|
Automatic Refresh Rate |
Enter a number in whole minutes. Click within the text box to relocate the cursor to the field, and then type (or paste from virtual clipboard) to enter a numeric value in the box as necessary to provide the desired information. As stated on the screen, a setting of ‘0’ does not allow for an automatic refresh to occur. |
|
Action List Page Size |
Enter a number of rows to display per page in the
Action List. Click within the text box (or press the tab |
|
Email Notification |
Select one of the following e-mail frequencies from the
list as desired: None,
Daily, Weekly or
Immediate. Use the drop-down |
|
Receive Primary Delegate Emails |
When you are a primary delegate, you will receive
e-mails sent when selected. Click within the checkbox |
|
Receive Secondary Delegate Emails |
When you are a secondary delegate, you will receive
e-mails sent when selected. Click within the checkbox |
|
Delegator Filter |
Select one of the following options from the list as
desired: Secondary
Delegators on Action List Page, or Secondary Delegators only on Filter
Page. Use the drop-down |
|
Primary Delegate Filter |
Select one of the following options from the list as
desired: Primary Delegators
on Action List Page, or
Primary Delegators only on Filter Page. Use the drop-down |
 key from previous field)
to relocate the cursor to the field, and then type (or paste from virtual
clipboard) to enter text in the box as necessary to provide the
appropriate information.
key from previous field)
to relocate the cursor to the field, and then type (or paste from virtual
clipboard) to enter text in the box as necessary to provide the
appropriate information.

Fields Displayed In Action List
The Fields Displayed In Action List section of the Workflow Preferences screen allows you to enable or disable individual columns that are displayed on the Action List screen.
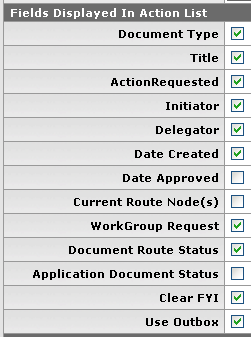
Figure 126 Workflow Preferences Screen – Fields Displayed In Action List Section Default Settings
Table 44 Workflow Preferences Screen – Fields Displayed In Action List Section Field Descriptions
|
Field |
Description |
|
Document Type |
Selected by default. Click within the
checkbox |
|
Title |
Selected by default. Click within the
checkbox |
|
Action Requested |
Selected by default. Click within the
checkbox |
|
Initiator |
Selected by default. Click within the
checkbox |
|
Delegator |
Selected by default. Click within the
checkbox |
|
Date Created |
Selected by default. Click within the
checkbox |
|
Date Approved |
Click within the checkbox |
|
Current Rout Node(s) |
Click within the checkbox |
|
WorkGroup Request |
Selected by default. Click within the
checkbox |
|
Document Route Status |
Selected by default. Click within the
checkbox |
|
Application Document Status |
Click within the checkbox |
|
Clear FYI |
Selected by default. Click within the
checkbox |
|
Use Outbox |
Selected by default. Click within the
checkbox |
Document Route Status Colors for Action List Entries
The Document Route Status Colors for Action List Entries section of the Workflow Preferences screen allows you to selectively color Action Requests based on the Route Status. Click one of the color options for each document route status. The row containing the document of the status is displayed in the color of your choice in the Action List.
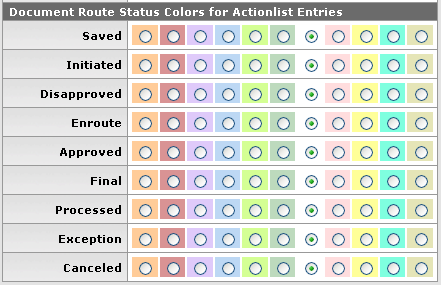
Figure 127 Workflow Preferences Screen – Document Route Status Colors for Action List Entries Section Default Settings
Table 45 Workflow Preferences Screen – Document Route Status Colors for Action List Entries Section Field Descriptions
|
Field |
Description |
|
Saved |
White is selected by default. Select the radio
button |
|
Initiated |
White is selected by default. Select the radio
button |
|
Disapproved |
White is selected by default. Select the radio
button |
|
Enroute |
White is selected by default. Select the radio
button |
|
Approved |
White is selected by default. Select the radio
button |
|
Final |
White is selected by default. Select the radio
button |
|
Processed |
White is selected by default. Select the radio
button |
|
Exception |
White is selected by default. Select the radio
button |
|
Canceled |
White is selected by default. Select the radio
button |
 by
clicking within a circle to place a dot within it to indicate your
selection of the desired option.
by
clicking within a circle to place a dot within it to indicate your
selection of the desired option.
 The effect of the
color preference change does not take place until you log onto the system the
next time.
The effect of the
color preference change does not take place until you log onto the system the
next time.

Figure 128 Action List Colored Row Example