E-Doc Topology
From top to bottom, e-docs start with a title and identifying information at the top, followed by a page navigation bar, under which the main body includes expandable/collapsible sections of each page that contain form fields for data entry and selection options, and finally at the bottom are action command buttons.
Key Terms, Concepts and User Interface Element Reference
Electronic documents are similar to paper forms you fill out with a pen in many ways in terms of their structure. The components of each may be referred to with similar terminology. Since a primary goal of KC is to replace paper processes, new users who already have expertise with paper processes will find it easiest to refer to equivalent portions of those used in the KC user interface by using similar names. There are some key concepts that are unique to electronic documents that are important for you to understand in order to use KC effectively. They are identified with differences described in the table that follows.
Table 11 Paper vs. Electronic Documents - Key Concepts and Terminology
|
Paper Document Elements |
Electronic Document Elements |
|
Documents have a Cover Page with front matter |
Documents have a Document Type label and Header area |
|
Documents are made up of Pages (to read a page, you turn to it with your fingers) |
Documents are made up of Pages (to read a page, you click on its tab) |
|
Pages are made up of Sections (to read a section, you focus your eyes on that section) |
Pages are made up of Sections (to read a section, you scroll to it and/or click show to expand the display view) |
|
Sections are made up of Subsections (to read a subsection, you focus your eyes on that subsection within a section) |
Sections are made up of Subsections (to read a subsection, you click a show button to display its content) |
|
Documents are Submitted for collaboration/review/approval (in person delivery, by mail, or by fax) |
Documents are Submitted for collaboration/review/approval (by clicking buttons) |
|
Documents are Approved (by signature with pen) |
Documents are Approved (by clicking buttons that electronically certify authorization) |
Header, Pages, Sections, Subsections and Buttons Explained
• Header: The header at the top, right corner of any e-doc contains the basic identifying system information about the e-doc. Some fields are document-specific, but common to all are Document Number (a.k.a. ID), Initiator, Status, and Created Date. In some cases the status is a system workflow route status, whereas in others it may be document-specific.
• Pages: The individual pages that make up the larger document are accessed via the page tabs that appear horizontally across the top of the e-doc, just below the header. The first page displayed usually corresponds to the leftmost page tab and usually requires entry of basic, identifying information that when successfully saved, allows you to continue to subsequent pages in left-to-right order.
• Sections (tabbed sections or panels): The body of each page is typically organized in a stack of labeled tabs that look like file folders. Based on the document type, a different set of tabs is displayed. To facilitate the document input (data entry) process, an initiated document opens with required tabs expanded and the optional tabs collapsed.
• Subsections within tabs: Some tabs may contain more than one section, each labeled with white text and a dark gray background. Sometimes each section has its own unique help icon.
• Buttons: The action buttons are displayed below the stacked tabs and differ based on the e-doc type, the e-doc page, your role and the status of the e-doc.
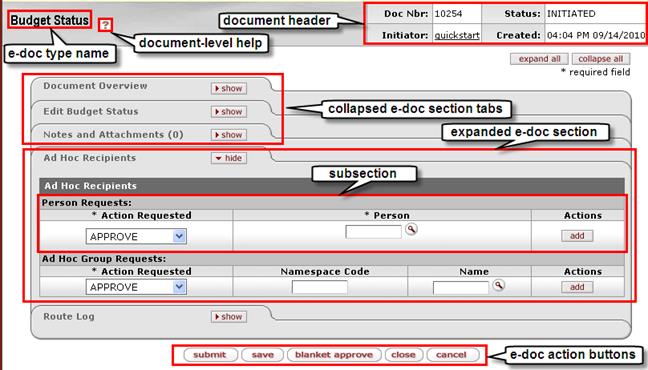
Figure 56 KC E-Doc Screen Overview