Tomcat Setup Instructions for Development Environment
- Setting up tomcat on your machine
- Setting up tomcat through MyEclipse
- Running tomcat through MyEclipse
- Setting up your project to run in tomcat in development
- Setting up your project to run in tomcat in test and prod
- Migrating from JBoss to Tomcat
- Tomcat test and production resources
- build.properties file for tomcat
- build.xml file for tomcat
- Communicating with OneStart Workflow from tomcat (coming soon)
- Setting up tomcat datasources
- Adding the datasource to web.xml
- Miscellaneous Database Connectivity Notes
1. Setting up tomcat on your machine
Extract tomcat into your /java/servers directory. You can download it from the following url:
http://sit-test.iu.edu/dav/channels/downloads/jakarta-tomcat-5.0.28.zip
Note: Copy the necessary oracle jars (i.e.: UIS_java_lib/oracle-10.1.0.2.0/ojdbc14.jar) to your tomcat common/lib directory. This will be used for datasources later on. Because of this, you do not want to include oracle libraries in your webapp from now on (ie: in WEB-INF/lib).
2. Setting up tomcat through MyEclipse
You will set up tomcat to be able to be run from the MyEclipse plug-in. This is all that MyEclipse will be used for in this new development environment.
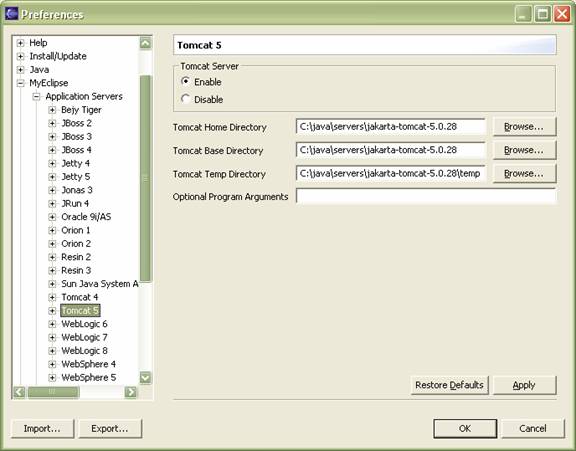
If you imported eclipse settings when you installed eclipse 3.0, then ecplise should be configured for you, but you can verify the configuration by going to the Window -> Preferences and then MyEclipse ->Application Servers -> Tomcat 5.0 and make sure that it is set to enabled and that the home directory is set to /java/servers/jakarta-tomcat-5.0.28 as in the screenshot below.
3. Running Tomcat through MyEclipse
To run tomcat through MyEclipse once you have ensured that tomcat is enabled relatively simple. You just need to use the running man icon. Select the dropdown arrow and you should get a tomcat 5 listing (as seen in the screenshot below). Then select to start the server. You can stop the server using the running man as well.

4. Setting up your project to run in tomcat in development
Tomcat 5 comes with a new option for configuring applications that it will run. It can now deal with independent context.xml files that allow us to point to where our project is and run it from that location.
In development, you will need to install the appropriate context.xml files for your application in order to get deploy on save functionality from tomcat. You can also circumvent the need to configure the application deployments through MyEclipse, and since there are a few odd things about deployment through MyEclipse, this should provide a consistent means for deploying projects, and additionally a slightly modified version of this type of deployment will be used in test and production environments.
Go to your /java/servers/jakarta-tomcat-5.0.28/conf/Catalina/localhost directory and create a file named <app>-<env>.xml for the application and environment that you are trying to setup.
You will need to fill in the contents of this file to point to where your project is located and a few other things, such as datasources if required for the application.
Below is an example file for the FO project. Notice that the docBase is pointing to the project web directory that is used for development. By having the reloadable attribute set to true on this context, the tomcat server will pick up changes in your classes and automatically update the code that is running without having to do anything other than save when you make a change.
<Context
path="/fo-dev" reloadable="true" docBase="c:/java/projects/FISCALOFFICER/fo">
<!-- datasources go here -->
</Context>
5. Setting up your project to run in tomcat in test and prod
Things will be set up mostly the same in the test and prod environments for tomcat. However, the way in which we deploy things will be a little bit different. It will leverage the existing deployment mechanisms used by our JBoss environment, and will only be slightly different in terms of deploying a war instead of an ear, as well as the context file that must be contained in a specific location within the war file.
The contents of the context.xml file will be slightly different for our test and production environments as well. The difference will be where the docBase is pointing. The test and production environments will be deploying a packaged war in a certain location. Below is the example contents of the context.xml file for test or prod, which must be named context.xml and placed in the META-INF directory in the web root of your project and finally packed in with the war.
<Context
path="/<app>-<env>"
reloadable="true" docBase="/usr/local/tomcat/<appserver>/webapps/<app>-<env>.war">
</Context>
Since this file is environment dependent, we need to make sure that we add this file to the list of files that are modified during the build to update the environment <env>. This should be done in your dist task and is likely already being done for your web.xml file. Below is an example of the ant code to modify this file:
<replaceregexp match="\b(dev|unt|reg|stg|trn|prd)\b" replace="${build.environment}" byline="true"
flags="g">
<fileset
dir=".">
<include name="${webapp}/META-INF/context.xml" />
</fileset>
</replaceregexp>
For a full example of the context.xml see Section 11.
6. Migrating from JBoss to Tomcat
There are some server changes that need to be done to migrate your applications from the JBoss environment to the tomcat environment. You will need to send a j2ee-request@iu.edu request letting us know that you want to switch your application from one to the other. Then, once you receive confirmation, you should be able to run the deployment after completing all of the necessary changes in this file.
7. Tomcat Test and Production Resources
Deployment Test Server:
x1j2ee
Deployment Prod Server:
penguin01
Test Servers:
x3j2ee
x4j2ee
Prod Servers:
penguin03
penguin04
Team Appserver Codes – need to go in /opt/ears/<env>/<app>/build.properties file
{sit2, fps2, onc2, ie2, hr2}
8. build.properties file for tomcat
The build.properties file that goes into /opt/ears/<env>/<app> for our builds in test and production environments will be slightly different than they were for JBoss. Below is an example of the build.properties file for the FO project. Note that the project.server, appserver.home, appserver.lib.dir, and appserver.deploy.dir have different values than they would have had under JBoss. You will need to check with WSA to find out the server name. It is likely that it will not be the same as your JBoss server name, but this is not always the case. But first please run a appdeploy -t undeploy-ear and appdeploy -t undeploy-datasource to uninstall the current ear and -ds.xml files from JBoss.
project.cvs.root=:pserver:anonymous@es01.uits.indiana.edu:/srcctrl/CVS
project.cvs.package=SIT/FISCALOFFICER
project.cvs.anonpassword=*****
project.home=SIT/FISCALOFFICER
project.server=sit2
appserver.home=/usr/local/tomcat/default
appserver.lib.dir=/usr/local/tomcat/default/common/lib
appserver.deploy.dir=/usr/local/tomcat/sit2/webapps
9. build.xml file for tomcat
The build.xml file for our projects will also need to change slightly from what it was under JBoss. Most of these changes will be nominal for those of us with Web Applications. Below is the build.xml file for the fo project and could likely be mirrored for most of our projects.
10. Communicating with OneStart Workflow from Tomcat
11. Setting up Tomcat Datasources
One additional thing that many of our applications need is datasources for connections to our databases. Tomcat comes out of the box ready to manage datasources for us. It is relatively easy to configure these datasources in your context.xml file.
The first place that the datasource must be configured is in your <webapp>/META-INF/context.xml file. Below is an example of configuration needed for your datasource.
Note: this content is placed in between the <Context> tags. Below is an example:
<!DOCTYPE doc
[
<!ENTITY ENDB SYSTEM "file:/opt/sa_forms/java/unt/edu/iu/uis/security/fo/ENDB.xml">
]
>
<Context
path="/<app>-<env>"
reloadable="true" docBase="/usr/local/tomcat/sit2/webapps/fo-unt.war">
<Resource name="jdbc/dev/fo/XA/EDEN"
auth="Container" type="javax.sql.DataSource"/>
<ResourceParams
name="jdbc/dev/fo/XA/EDEN">
<parameter>
<name>factory</name>
<value>org.apache.commons.dbcp.BasicDataSourceFactory</value>
</parameter>
<parameter>
<name>maxActive</name>
<value>100</value>
</parameter>
<parameter>
<name>maxIdle</name>
<value>5</value>
</parameter>
<parameter>
<name>maxWait</name>
<value>10000</value>
</parameter>
&ENDB; <!--
rename this to your file -->
<parameter>
<name>driverClassName</name>
<value>oracle.jdbc.driver.OracleDriver</value>
</parameter>
<parameter>
<name>validationQuery</name>
<value>select
1 from dual</value>
</parameter>
</ResourceParams>
</Context>
Note: &ENDB; is the line that includes the contents of the file that contains your username and password to log into the database. This xml file should go in your security directory for your application:
/opt/sa_forms/java/<env>/edu/iu/uis/security/<app>/<app><resource>.xml
The contents must follow the format shown below:
<parameter>
<name>username</name>
<value>USERNAME</value>
</parameter>
<parameter>
<name>password</name>
<value>PASSWORD</value>
</parameter>
<parameter>
<name>url</name>
<value>jdbc:oracle:thin:@es01.uits.indiana.edu:1521:GEN1TST</value>
</parameter>
12. Adding the datasource to web.xml
Now you need to add the following piece of code to your web.xml file. Then change the datasource name and description to fit your application.
<web-app ...>
<!--
this goes at the very end of web.xml -->
<resource-ref>
<description>OneStart
Oracle Datasource</description>
<res-ref-name>jdbc/dev/my/MYDB</res-ref-name>
<res-type>javax.sql.DataSource</res-type>
<res-auth>Container</res-auth>
</resource-ref>
</web-app>
13. Miscellaneous Database Connectivity Notes
If you use OJB to connect to your database using jndi, you should be all set.
If you are using JRF, you may need to make a few modifications. Below is a code snippet to get a JRF JDBCHelper object. The main thing to note is the beginning of the lookup. You will need to add the comp/env to the jndi that you would normally use.
public static JDBCHelper
getHelper() {
DataSource dataSource = null;
JDBCHelper jdbcHelper = null;
try {
dataSource
= (DataSource) new InitialContext().lookup("java:comp/env/jdbc/" +
getEnvironment() +
"/my/MYDB");
jdbcHelper
= new JDBCHelper(dataSource);
if (jdbcHelper.getConnection() == null) {
jdbcHelper = null;
LOG.error("error in getHelper - unable to get db connection");
}
} catch (Exception e) {
LOG.error("error in getHelper",
e);
}
return jdbcHelper;
}